Adjusting Drum Brakes
Almost all new vehicles are fitted with disc brakes, but off-roaders are a quirky breed. How many of us are still driving around in old but faithful wagons that we wouldn’t part with because we know them inside-out and value their bombproof reliability? Quite a few. If you’re one of them, and your vehicle is old enough, it’s a good guess that one of the less reliable bits is the brake system.
Many of the more popular older 4wd models don’t have disc brakes; they have drum brakes. A lot of newer 4x4's have drum brakes as a hand-brake mechanism too! There’s nothing at all wrong with drum brakes – they’ll stop you very effectively – but they do need to be kept in good shape.
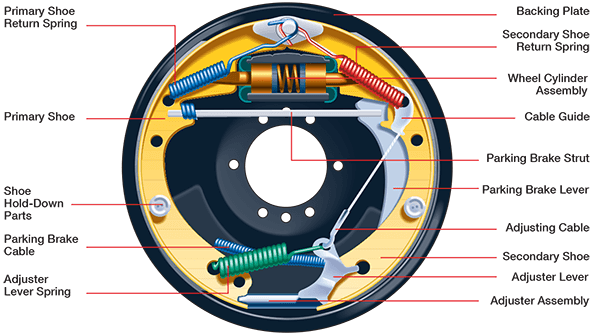
In a drum brake the disc of a modern system is replaced by the drum, an open-ended cylinder that’s fixed to the wheel and axle. The brake shoes are inside the drum; when you press the brake pedal fluid from the master cylinder flows down the brake lines to the wheel cylinders and pushes the brake shoes out until they contact the drum. As soon as the shoes touch, the drum’s rotation pulls them tighter against it. That creates friction, slowing the drums – and the wheels. It’s simple and very effective.
Where you start to get problems is when the brakes aren’t properly adjusted. When this happens the brake shoes on one side touch the drums before the other side, and you’ll find yourself pulling left or right when you brake. Luckily it’s easy to adjust the brakes and sort this out.
The first step is to disengage the handbrake (this locks the drums) and remove the brake drums. This can be tricky; they’re made of cast iron, and if you’ve driven through a few rivers they might be frozen (Ok, rusted) in place. Try tapping the face of the drum with a hammer to loosen it.
Once you have the drums off, check the brake shoes. If their lining is less than 1mm thick they’ll need replaced. Now look at the wheel cylinders. These have rubber dust boots on them; pull these out and look inside for any signs of brake fluid. If you can see any, the cylinder has bad seals and will need replaced – and so will the one on the other side; always replace wheel cylinders in pairs. Check all the springs, clips and retainers inside the brake too, and replace anything that looks loose, damaged or cracked. Finally, look for wear on the inside of the drum itself.
Now that you’ve made sure everything is in good shape it’s time to adjust the brakes. The brake adjuster is a lever on a screw thread that sets the distance between the shoes and the drum. In some brakes there’s a slot in the back plate that lets you adjust it with the drum in place; in others you have to adjust them with the wheels and drums off, which takes a bit more time.
Slowly turn the adjuster screw until the brake shoes grips the drum and stops it turning. This is a pain if you can’t adjust through the back plate, as you’ll have to keep putting the drum back on to see if it’s touching the shoe. Bad news – this can’t be helped. Once the shoes are locking the drum, slowly back the adjuster off just far enough that the drum can turn freely again. To do this you’ll need to find and lift the locking ratchet that stops the adjuster from unscrewing itself; usually a small screwdriver pushed through the backing plate will do this.
Try to back off the adjuster the same amount on each wheel, and you should end up with the same brake travel on all four of them. Once you’ve managed that your drum brakes should be in top shape again, ready to bring you to a halt effectively and in a straight line.