Installing lockers & regearing differentials
When it comes to differentials or "diffs" in your 4x4, there's a lot of mystery and as to how they are setup and whether the job should be
left up to a professional. In this article we intend to dispel some mystery behind your differentials and show you how you can install a
locker or regear your diff in your home garage. This guide is based on a Jeep JK Dana 30 front axle but a lot of what is discussed will
apply to most 4x4 vehicle diffs out there. Working on an axle is not rocket science, with the right tools and a lot of research, anyone
with some mechanical ability can install gearing.
Why regear a differential?
Every 4x4 owner strives to obtain more ground clearance under their vehicle. We can do this by modifying the suspension to lift the vehicle higher, but this doesn't solve all the problem. In most cases (with solid axles) the vehicle differential clearance from the ground has not changed.
Here's where bigger tyres can play a huge part in your vehicle setup. By changing the diameter of your tyre you not only increase your overall clearance, but also the diff clearance as well. There're many benefits to changing tyre size including increasing your traction along with the ability to air down to a lower pressure.
An often unthought of consequence of a larger rolling diameter is the vehicle's ability to accept our tyre choice. The larger tyre you put on, the poorer the vehicle will perform both on and off road. Performance can be regained by increasing engine power output with exhausts and increasing boost etc. however increasing output doesn't deal with the real problem.
Re-gearing your differentials are the most beneficial way to return the performance lost in the larger rotating diameter of the tyres. Everyone who has fitted bigger tyres to a vehicle has noticed the most benefit in re-gearing the diffs to suit the larger tyres.
Re-gearing is essentially changing the gear ratio between the driveline and the axles. The smaller the number (higher ratio) the faster the car will go (with the same number of RPM), the bigger the number (lower ratio) the faster the vehicle will accelerate (at the expense of some highway cruising speed).
Note: You must always change the front and rear ratios at the same time. Never attempt to drive a vehicle with 2 different diff ratios as this will result in axle wind up and will damage a lot of vital components.
Researching diff ratios for your vehicle is an excellent idea. Look into diff gear ratio charts and read about others experiences with different ratios before you jump in and order a re-gear kit. Be sure to order a diff rebuild kit along with the gears so you can replace all of the bearings and seals while it's apart.
For the purposes of this article the Jeep JK Wrangler Sport came fitted with a 3.21:1 ratio, commonly just called 3.21 gears (a relatively high ratio). The new gears being installed are 4.11:1 or just 4.11's. This gear set was specifically chosen for the CRD model Wrangler due to the desired set of 35x12.5R17 tyres that will be fitted.
Why do you need diff lockers?
Differentials allow two wheels on the same axle to spin at different speeds, this comes in handy when you’re doing stuff like going round corners. If it’s not obvious why that’s a good idea just remember that the inside of a curve is a shorter distance than the outside. When you steer round it the wheel on the inside doesn’t have as far to go, so if it’s turning as fast as the outside one it’s going to slip against the surface.
Obviously none of this is a good idea, so your differential is a big help. It works through a complex system of gears that shifts more of your engine’s torque to the wheel that’s turning faster. That’s great stuff on roads, but it’s not always what you want when you're off-road.
When you’re off road you’re going to get in a lot of situations where one wheel’s turning faster than the others. Your unlocked differential
is going to want to shift engine power to that wheel, because that’s what differentials do, but that can be bad news. If one wheel can spin
faster it’s probably because it doesn’t have as much traction for example it might be in the air or slipping in mud or sand. The
opposite wheel will then be at a stand still with no drive to the ground.
With a locked diff, the transmission will keep all four wheels turning at the same speed, no matter how much grip they have. This
results in a lot more traction in slippery situatons.
For the purposes of this article we are going to be installing Harrop E-Lockers to the front and rear of the Jeep JK Wrangler. These are an electronic selectable diff locker that replaces the entire carrier of the diff.
Diff Locker Types
Sometimes we think half the fun of owning an off-road vehicle is modifying it and adding accessories. There’s a huge range of upgrades available for modern 4wds, and they can transform your wagon’s touring capabilities.
There’s one thing a lot of people overlook, though – diff lockers. These come as a factory option, or even a standard feature, on many models; there are aftermarket kits available to fit them to just about any other vehicle. If you don’t have them already they’re one of the most useful upgrades you can make. A diff locker will improve traction, help you get through really tough terrain, protect your drive train and let you keep going with a broken axle or cv joint.
It isn’t just a matter of buying a set of diff locks though – there are different kinds, all with their own strengths. The most economical option is an auto locker, what’s often called a “lunchbox locker”. These are the easiest to install; they’re mounted inside your transfer care, replacing the spider gears (and sometimes side gears and cross shafts). Once fitted they put the vehicle in permanent diff lock, but unlock it automatically for cornering. They have their down sides, but they’re cheap and effective if you’re happy to live with their sometimes agricultural performance.
Full carrier auto lockers are a more refined version of the lunchbox locker, but they need a bit more work. Fitting one involves replacing the whole of the stock diff, keeping just the crown wheel and pinion. They’re simple to run – they work automatically – and not as clunky as lunchbox lockers can be. They’re also very strong, and give a real boost to off-road performance without too much compromise to road handling.
Pneumatic lockers aren’t automatic; you can lock or unlock them with the push of a button. They work by using compressed air to slide the clutch gear between locked and unlocked positions. The big advantage is that you can disengage the locker when you don’t need it, meaning no loss of performance on roads. The down side is that you need a compressor to power it, and if the compressor or an air line is damaged the locker won’t work.
A newer option that gives the advantages of a pneumatic locker without the drawbacks is an electromagnetic locker. These are the latest diff-locking technology; they work pretty much the same as a pneumatic locker, but instead of using air pressure to slide the clutch gear they use electromagnets. That makes them quiet, fast and reliable – and it’s a lot easier to repair a damaged wire than a damaged high-pressure air line.
We stock Harrop ELockers for most popular off-road vehicles. These are outstanding bits of kit, using precision-forged Eaton gears that are stronger and more reliable than standard gears. They’re simple to install and even easier to use – just push the button and feel your traction instantly improve. If your wagon doesn’t have a diff locker already, this upgrade will do more to improve off-road performance than just about anything else you can do.
Axle (dis)Assembly
Prior to starting, it is very important to research how your diffs are assembled. Obtain a factory workshop manual with torque specifications and bearing preload information before you dive in and start taking apart your differentials.
There is lots of (mis)information out there regarding this particular JK Wrangler front diff and after having ours disassembled I put
together a correct diagram showing all the parts in their correct order.
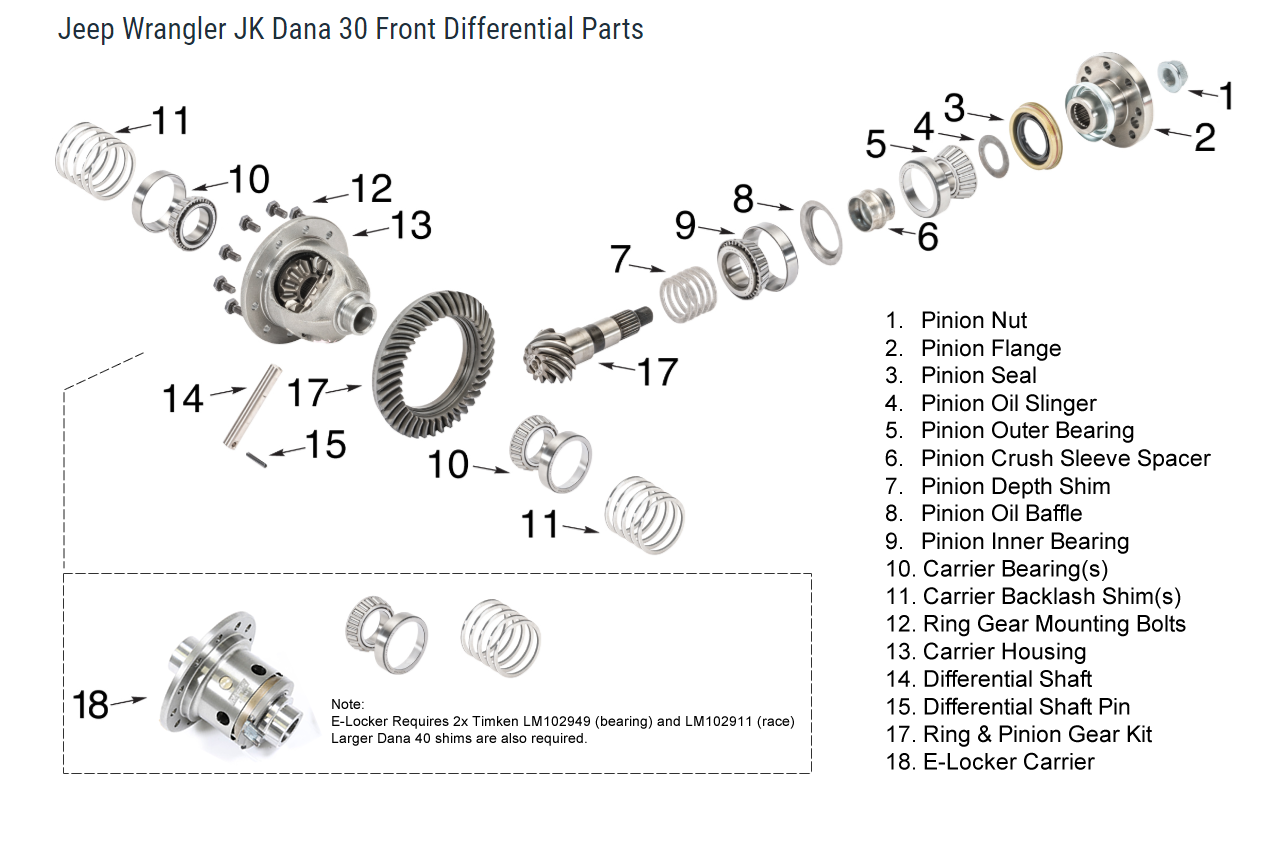
I suggest while you are disassembling your differential you make a similar diagram on paper outlining where all the parts go. It is also equally important to mark parts along the way with a coloured paint pen or similar to identify which side of the diff they come from. This is very important for the bearing caps (which should be identified with a punch) and shim positions as they will only go back correctly in one position.
This article will not endeavour to describe every detail of disassembly of the diff and will rely on you to utilise your workshop manual to strip the axle housing bare. We suggest you remove all the old seals and bearing races in order to replace them before installing the new gears and locker.
It is also important to note that some OEM carriers will not be able to handle the lower ratio diff gears due to their size. This may
require full replacement of the carrier or installation of a locker of the correct size. It is generally recommended in this situation
to install a locker as we are in this article.
Required Tools
Your differential may require additional specialist tools other than what is listed here. These are the tools required to rebuild
most diffs and are suitable for the JK Wrangler Dana 30 diff. Before you start, consider if purchasing the tools and spending the
time to set up the diff correctly is for you. Look over this list of tools, some of which you may already own.
- 1/2" Socket Set (decent quality) to disassemble and reassemble bolted on parts. Check the sizes of sockets you require. The JK requires an 18mm, 21mm, 30mm and 35mm socket which you may not own.
- Larger breaker bars
- Digital Calipers able to read 0.001" (thousandths of an inch)
- Dial Indicator with magnetic base
- 3-Jaw Puller
- Dead Blow Hammer or Rubber Mallet
- Hydraulic Workshop Press
- Ft/lbs Torque Wrench (clicker style or digital)
- Inch/lbs beam or dial style Torque Wrench
- Large Pipe Wrench or Pinion Yoke Wrench to suit your diff
- Bearing Splitter
- Bearing / Seal Driver Kit (large style)
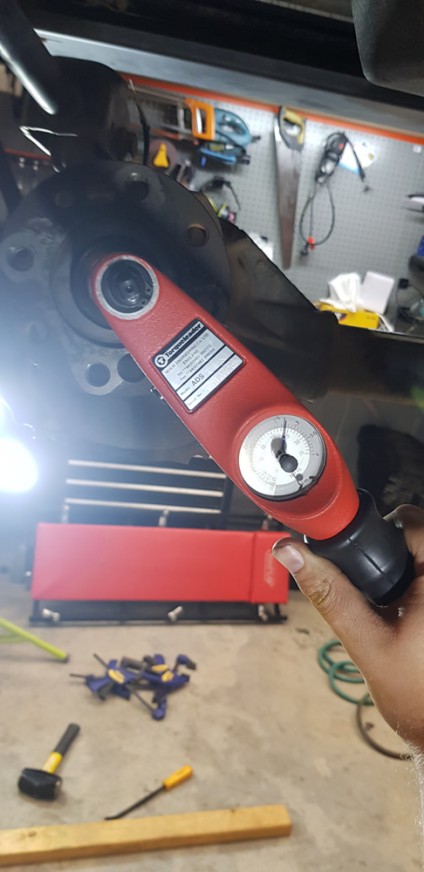
The stand-out tool in this list is the inch/lbs beam or dial style torque wrench. This wrench is required in order to properly set your pinion baring preload. It cannot be done with a clicker style wrench.
The calipers are required to measure shim thicknesses.
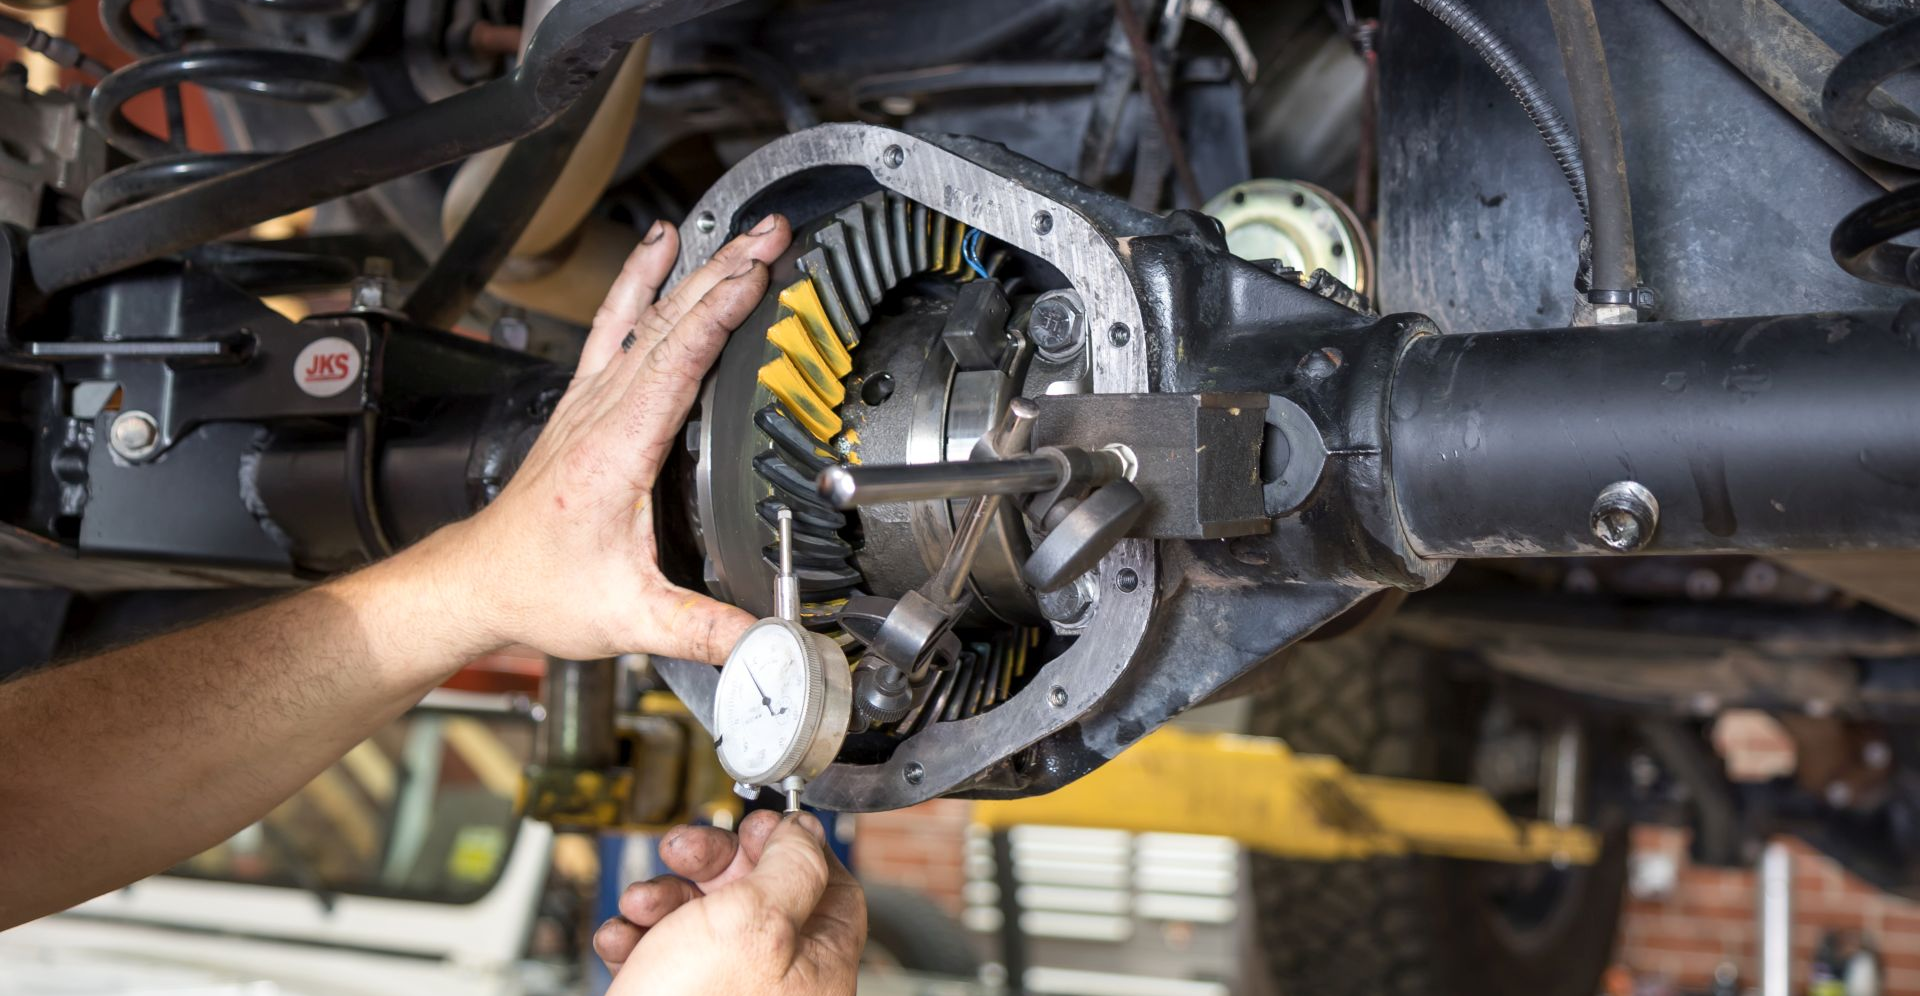
The Dial Indicator is required to measure diff backlash. Another tool that is required for this job.
What is Preload?
Differentials use a conical roller bearing in its assembly. These bearings reuire a certain amount of load or pressure to be excerted on them. Essentially the cone needs to be squeezed into it's respective race just the right amount in order to have a reasonable lifespan. If the preload is too little or too much, the bearing life will be significantly reduced. This is why it needs to be measured in the set up of the diff.
Pinion preload is measured by it's rotational torque. To do this the pinion is installed into the bare diff and the pinion nut tightened enough so that there is no play back and forth. The pinion is then turned at a steady rate whilst watching the dial or needle on the inch/lbs torque wrench.
The manufacturer workshop manual will specify the correct torque range for your pinion bearings. In the case of the JK Wrangler D30 it is specified to be 0.79 - 1.24 Nm (7 - 11 in. lbs.).
What is Backlash?
Backlash is a measure of play between the ring gear and the pinion gear teeth as they mesh together. It's a measurement of the amount of space between the teeth contacting one another. This is measured with a dial indicator in thousandths of an inch. Your workshop manual will specify the range of backlash allowed. In the case of the JK Wrangler D30 it is between 0.005" to 0.008".
Backlash is adjusted by adding and removing carrier shims. If the backlash is reduced too much the gears will mesh together too tightly resulting in overheating and possible failure of the gears. If it is set too wide, it is possible to chip the gears and cause failure.
Installation
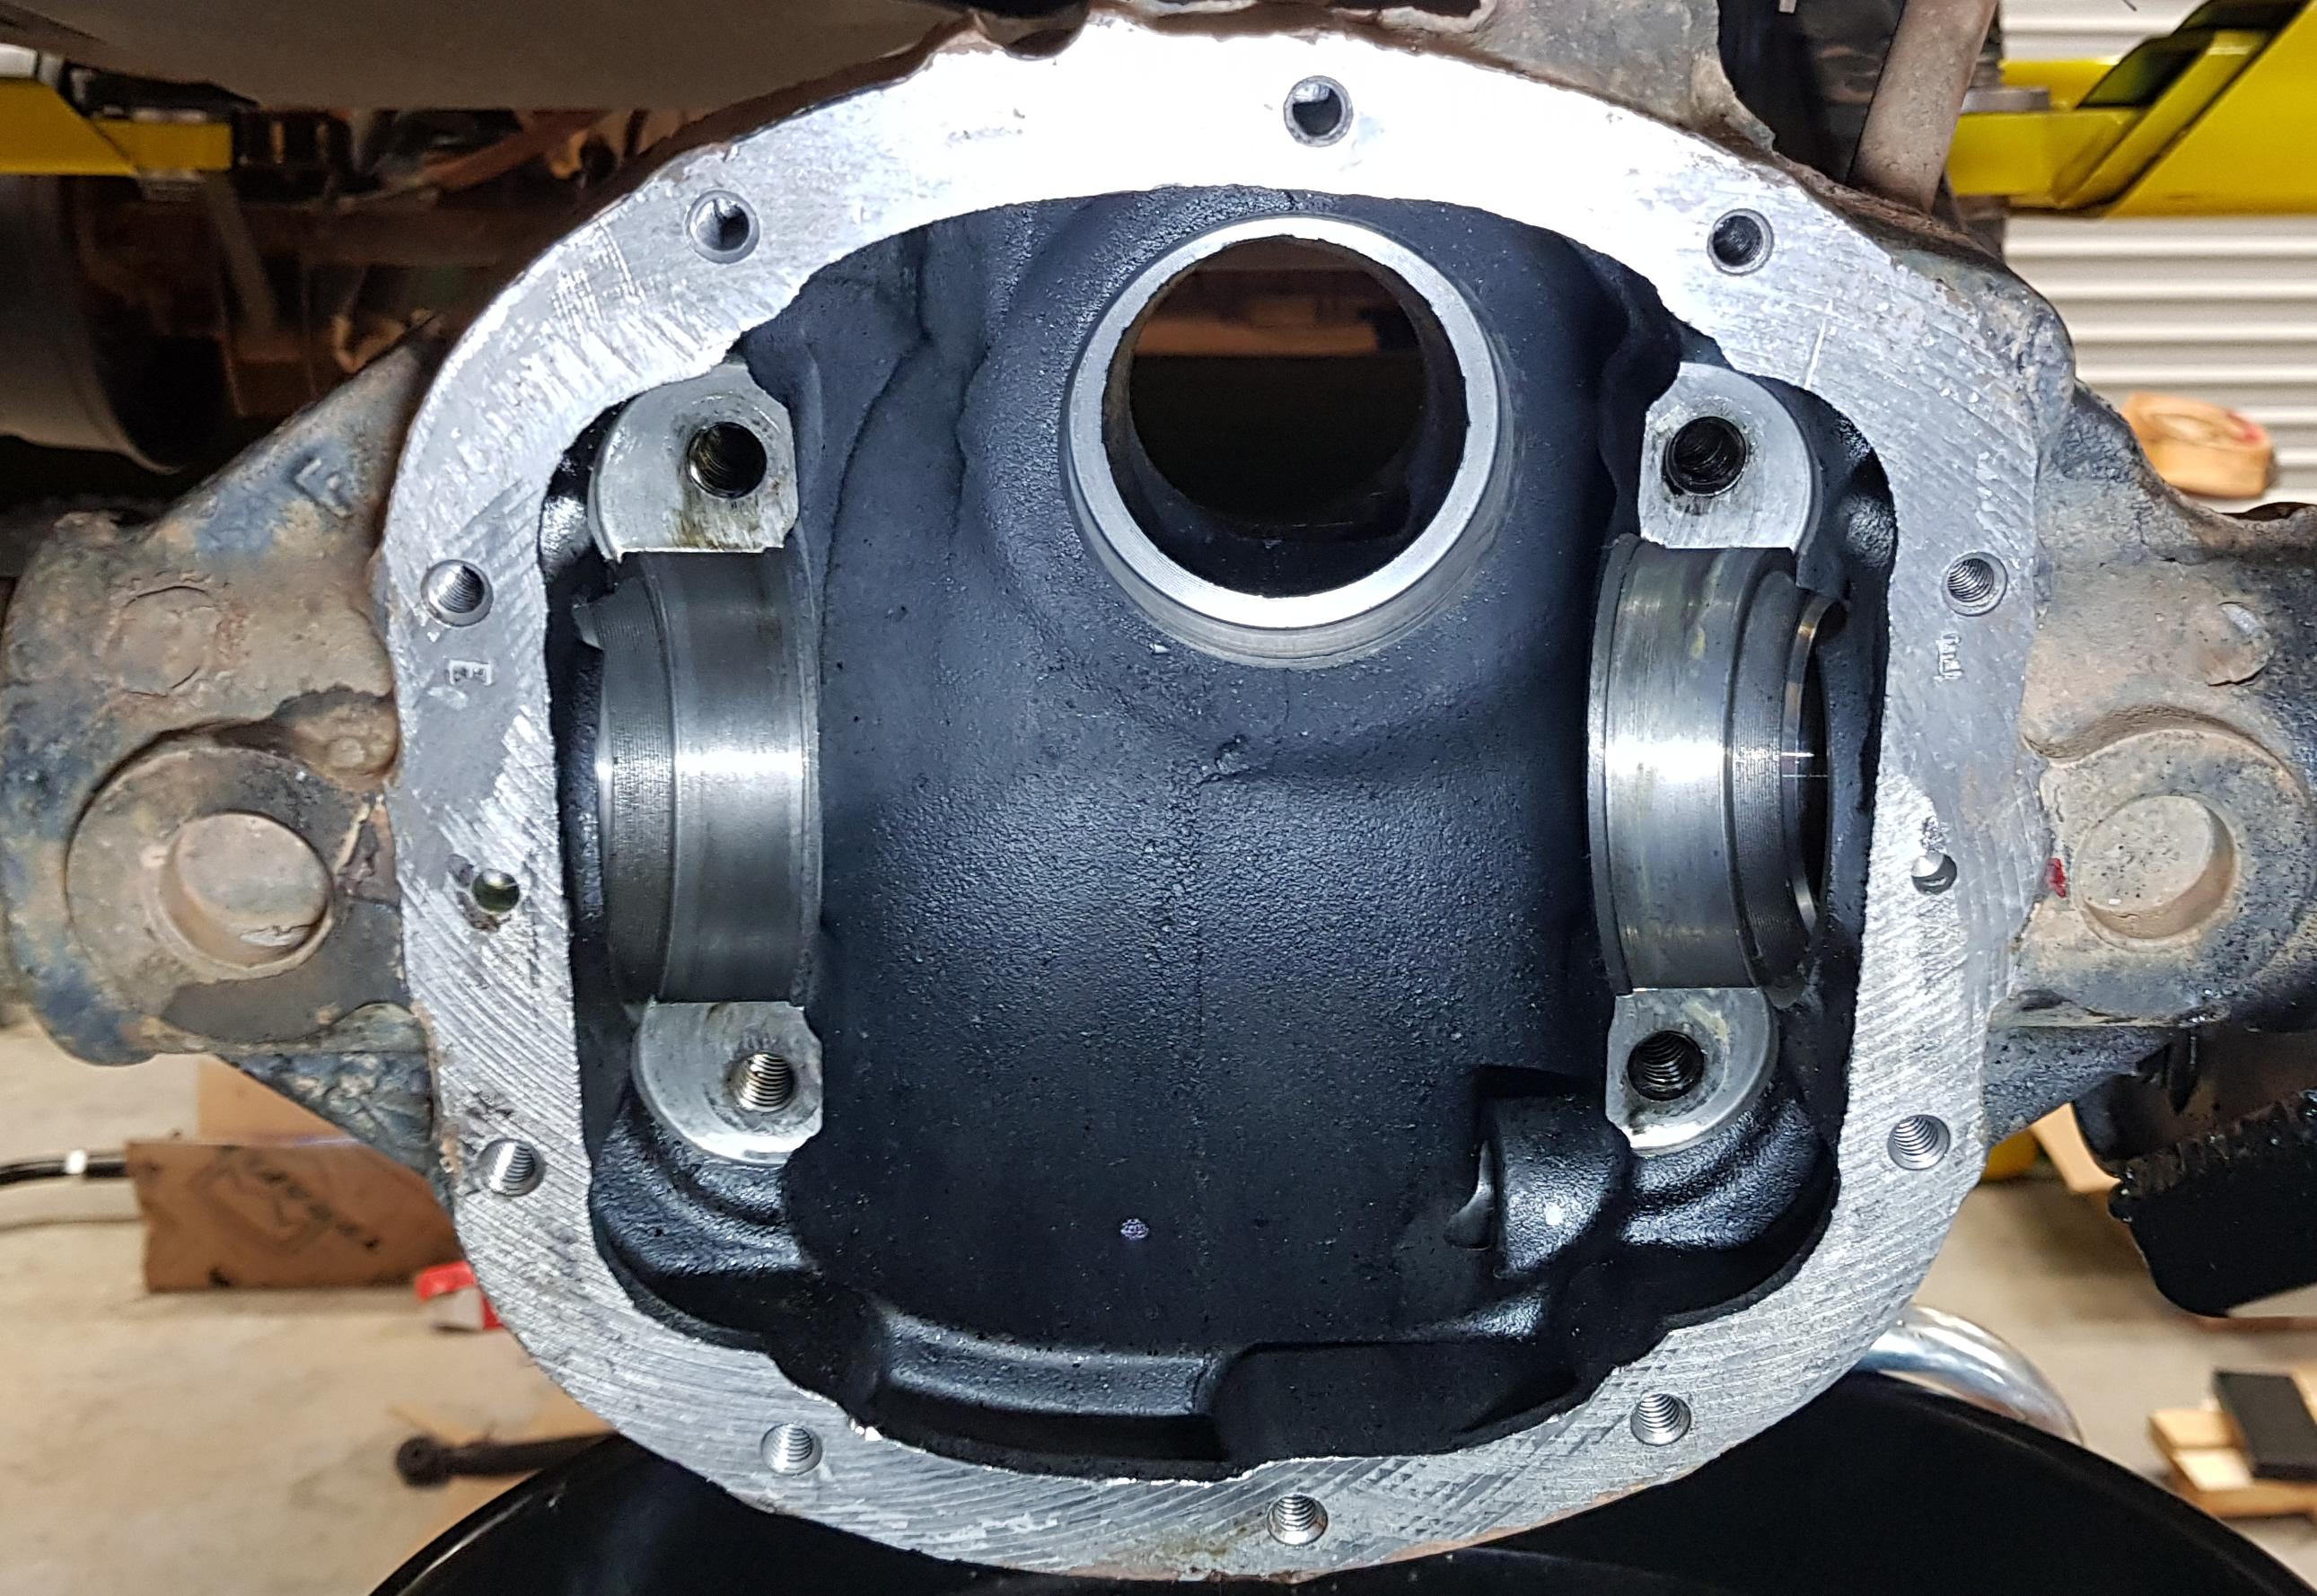
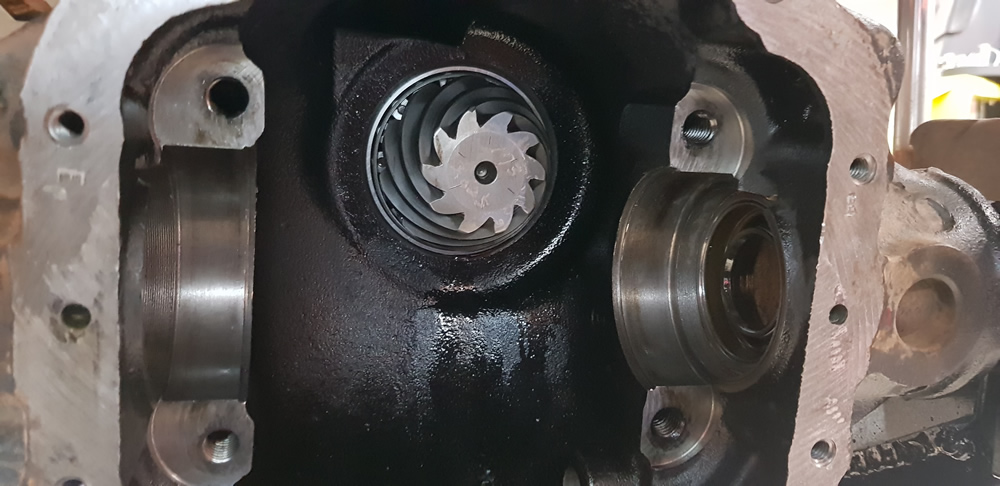
This installation begins from a bare axle housing with the axle seals, pinion seal and bearing races removed. Removal of these components should be done in accordance with your workshop manual. Bearings and seals should be carefully tapped out or pulled with a seal puller. Be sure to clean the housing of your diff thoroughly with brake clean and wipe out with a lint-free rag.
This is what the diff should look like once you've got it empty and clean.
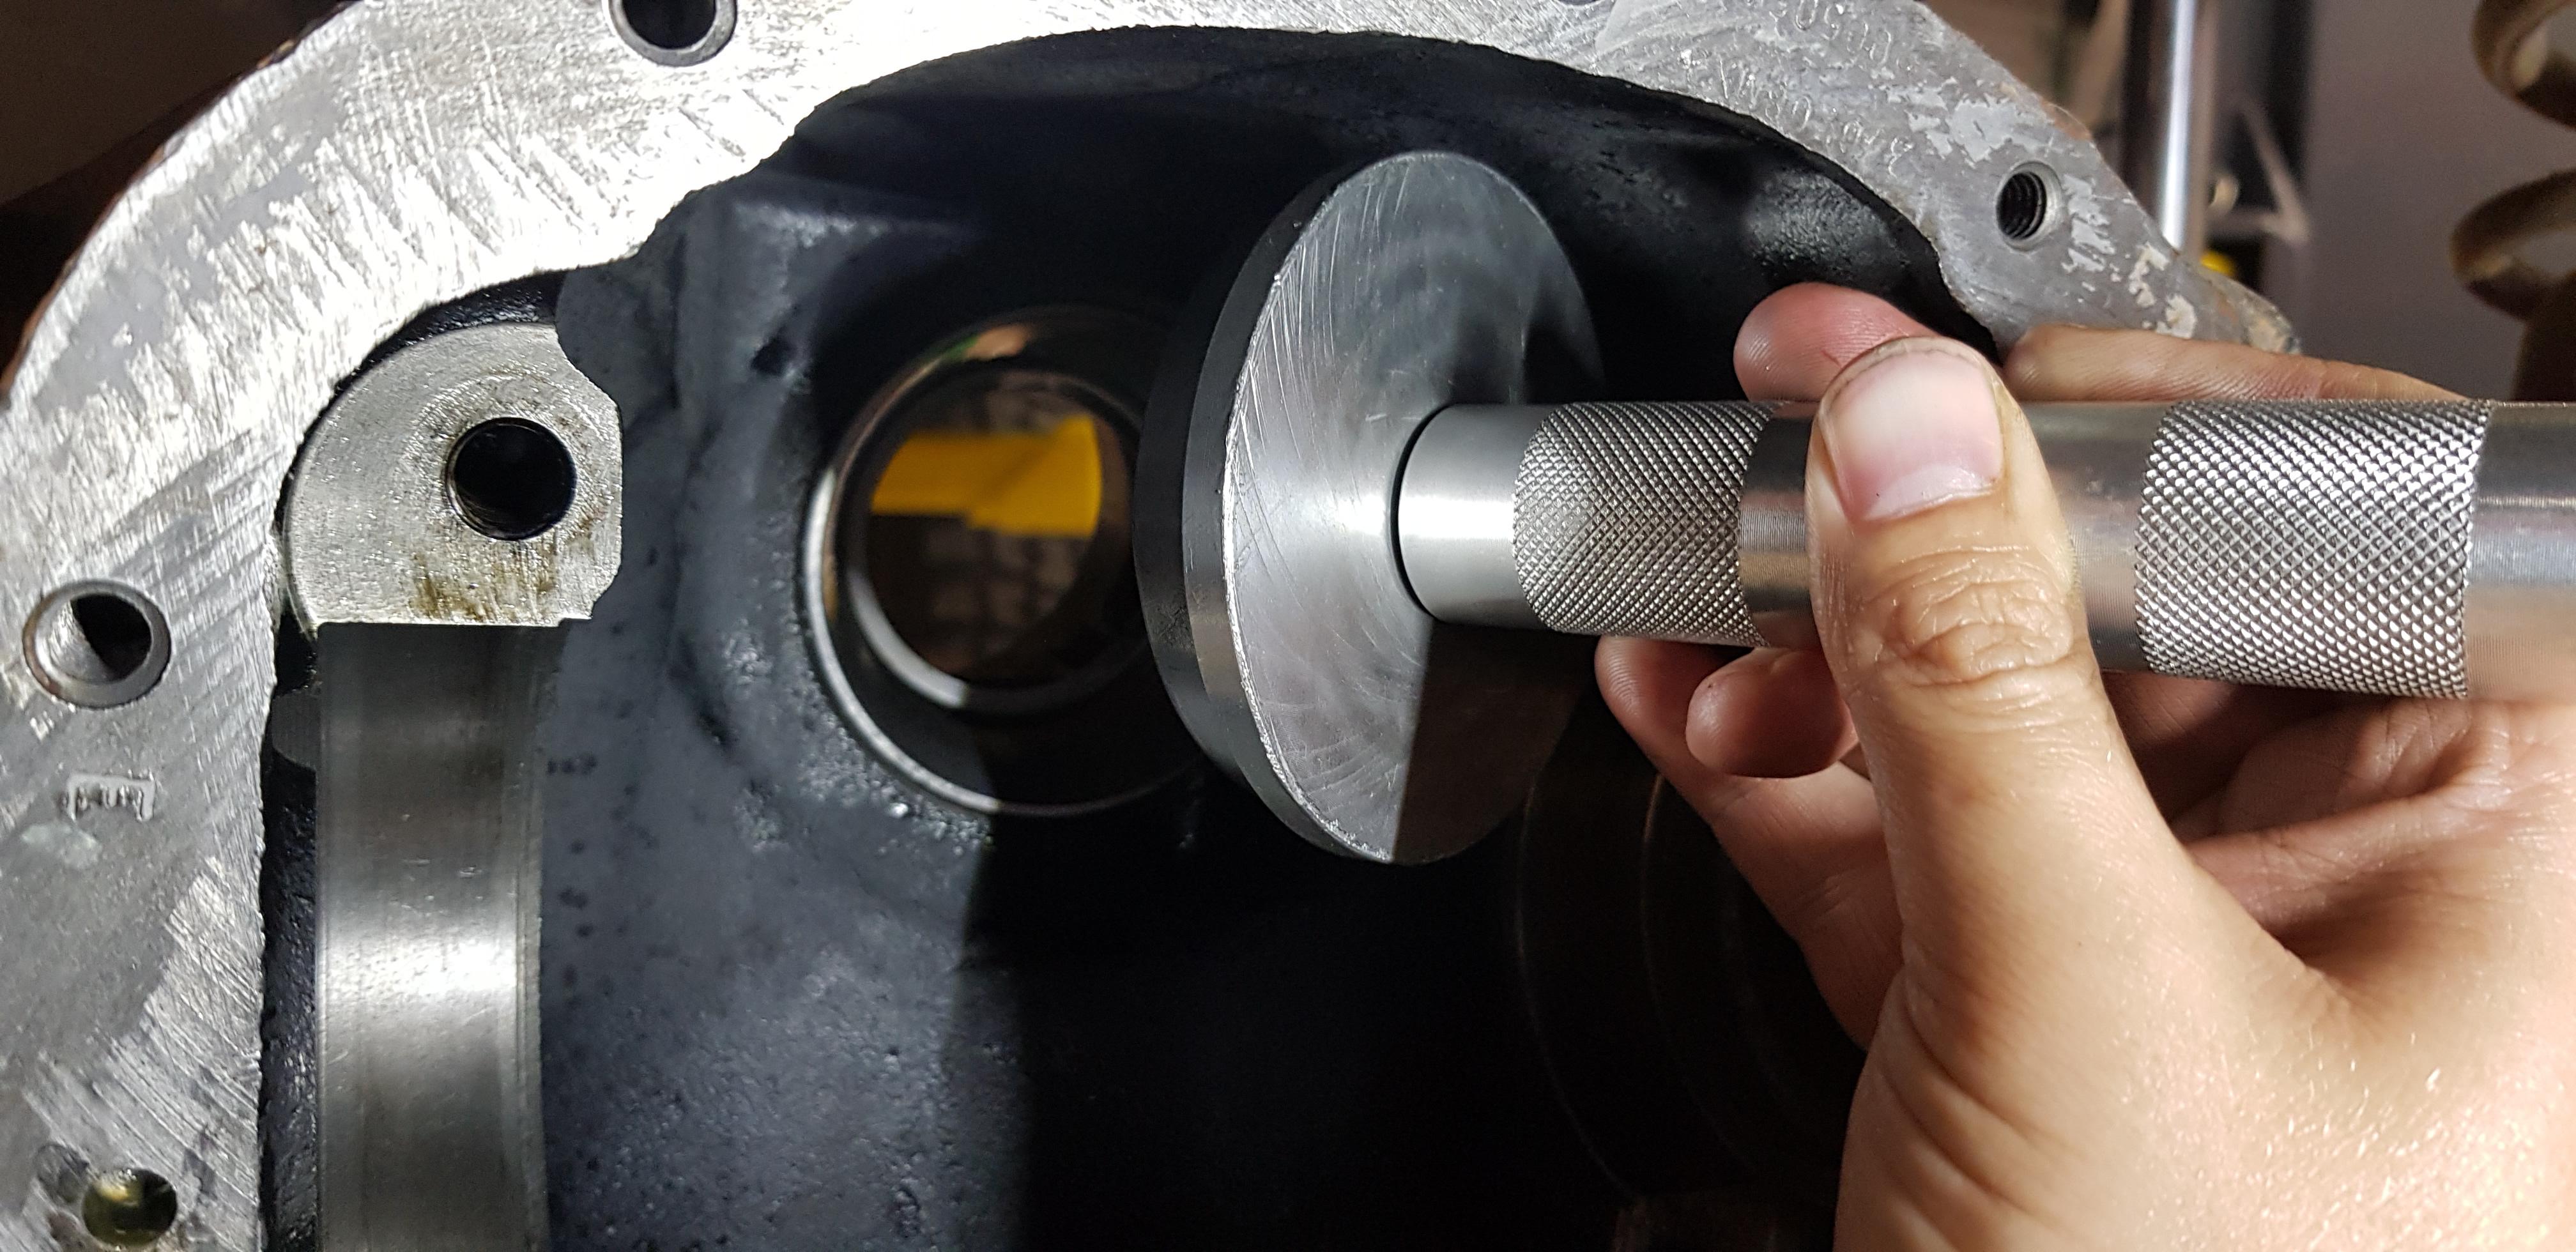
Bearing Race Installation
The new bearing races should be installed using a seal/bearing driver. Lubricate the
bearing race with gear oil prior to installing. A neat trick is to put the bearing races in the freezer the day before, this will
shrink them slightly allowing an easier install.
Align the bearing race with the housing and using the correct size driver, pound the driver with a small sledge hammer so that the bearing race presses into place as straight as possible. Be sure to listen to the tone of the hammer as you hit. The sound will change once the bearing race is completely seated.
Install the inner pinion bearing race first, then proceed to the outer. Make sure any components in between the races are also
installed in the correct order. In our case the Pinion Oil Baffle was pressed in behind the inner bearing race.
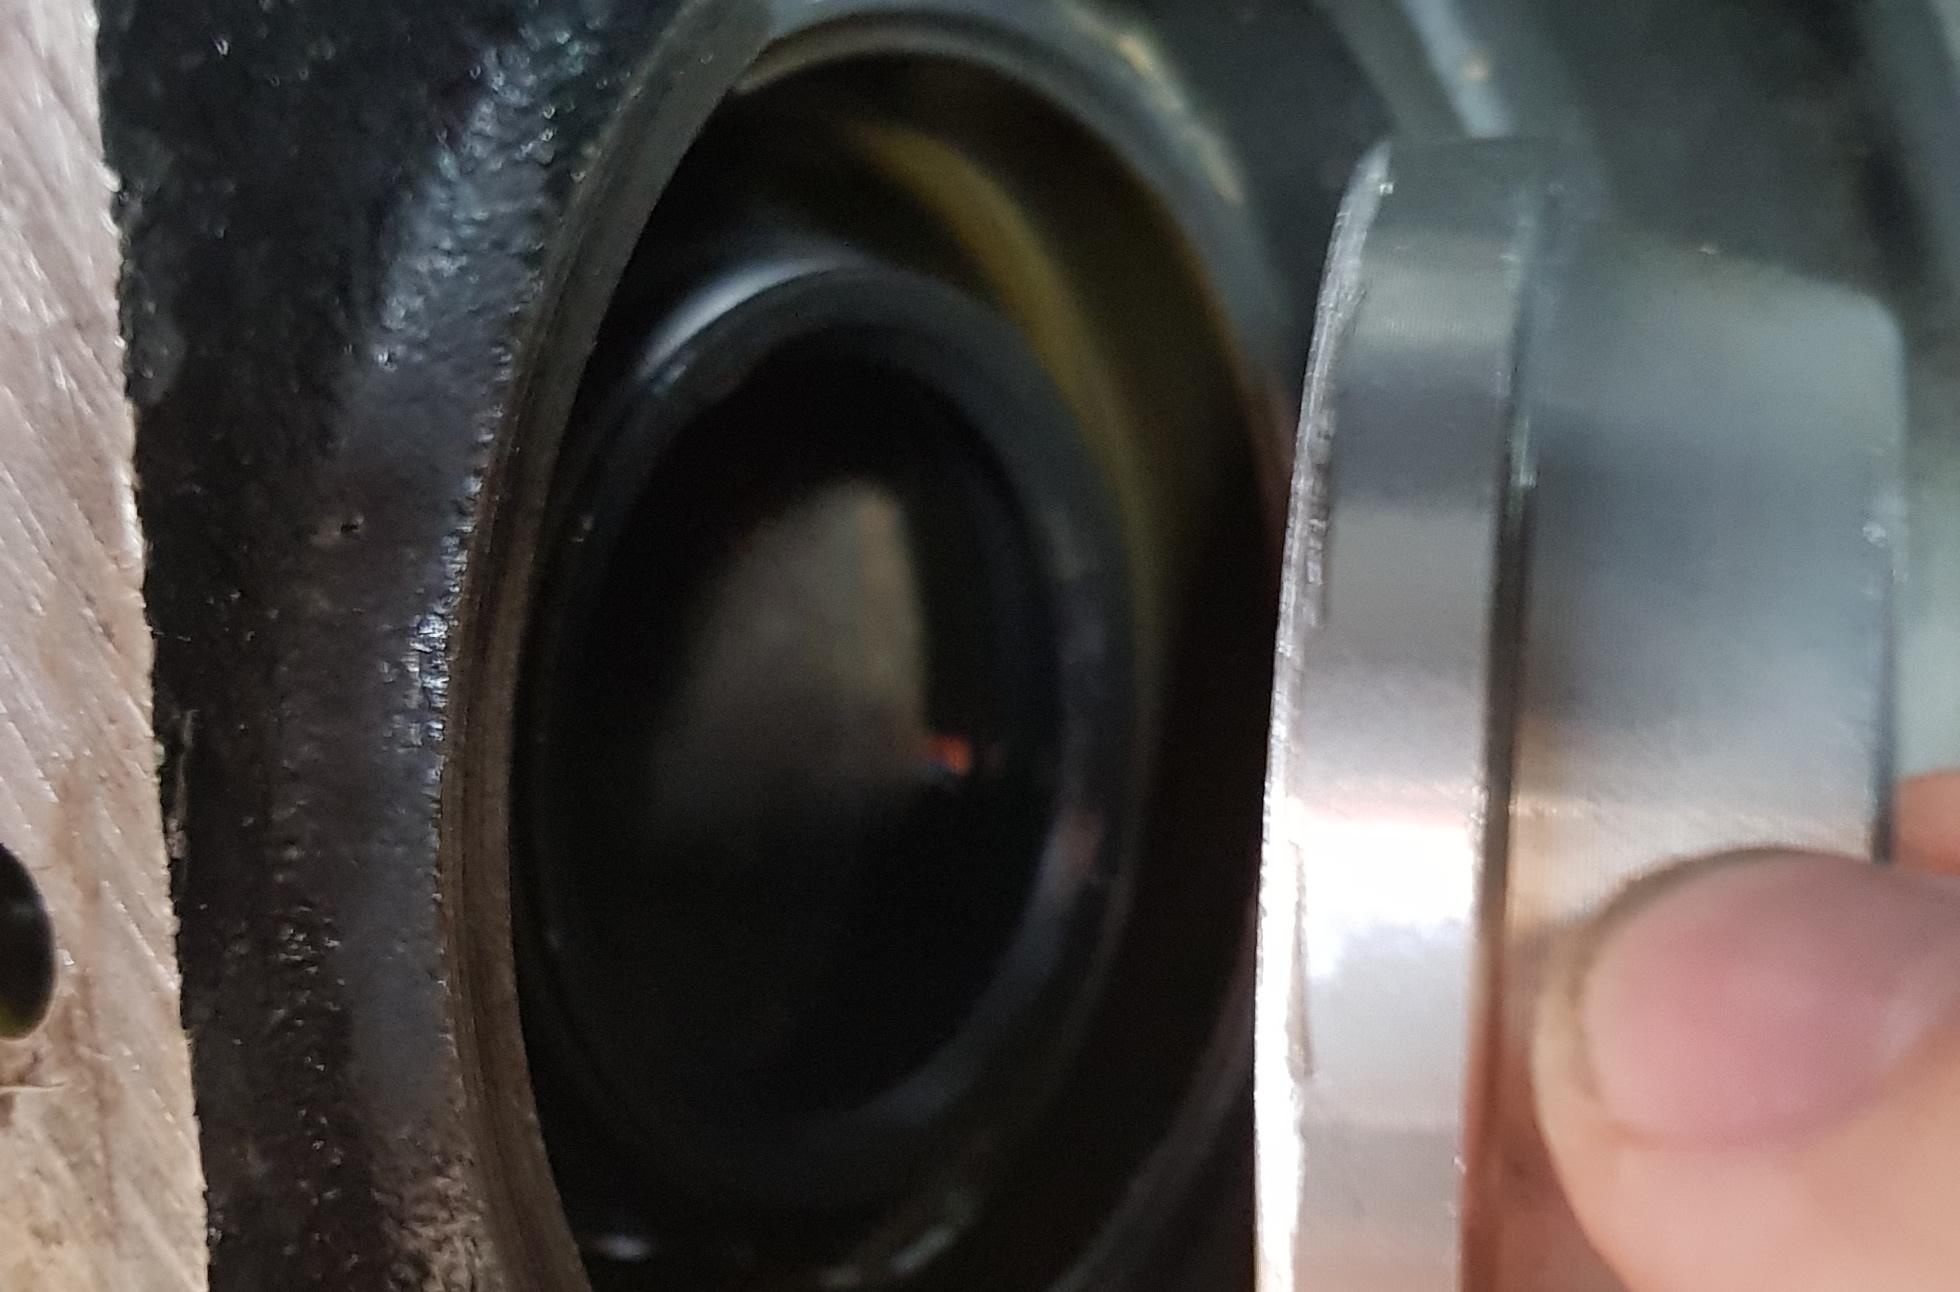
Axle Seal Installation
It is tricky to get the axle seals in straight. I carefully tapped the seals in
with a seal driver working my way around the seal evenly driving it into place. Make sure you lubricate the seal before installation
with gear oil. The freezer tip will also work here.
Pinion Setup
You are now ready to set up your new Pinion. To do this, you will need a shim kit from your
diff rebuild kit as well as new inner and outer bearings (the ones you installed the races from in the previous steps). The Pinion
depth is determined by the height of the shims added before the inner bearing is pressed on.
Start by using the original shim (or new shims matching the original shim height) and pressing on the inner bearing. This gives you a baseline for the Pinion depth. Some people use dummy bearings so you don't have to keep pressing the bearings on and off the pinion.
You will then install the pinion and inner bearing, outer bearing and yoke back into the diff housing using the old pinion nut. Tighten the pinion nut until there is no more free play front to back on the pinion. Do not tighten too much at this step.
At this stage we don't install the oil slinger, oil seal or the new pinion nut at the rear of the pinion because we don't want to damage them when the pinion has to come out multiple times.
To correctly install the pinion we need to set the pinion bearing preload. To do this you need to tighten the pinion nut at small increments then check repeatedly with an inch-pound dial torque wrench. Tighten the pinion nut approximately 1/4 turn at a time then check the torque to rotate the pinion. Check your workshop manual or gear install guide to see what your recommended pinion preload is. For the Dana 30 with new bearings the pinion preload is recommend to be set to 15-30in/lbs.
Once you have reached the desired pinion bearing preload, do not over tighten. The pinion is now installed for testing the pinion depth.
Diff Locker & Crown Gear
For the purposes of this article we are installing a new diff locker (carrier) and crown gear so the old carrier and crown wheel will not be disassembled or reused.
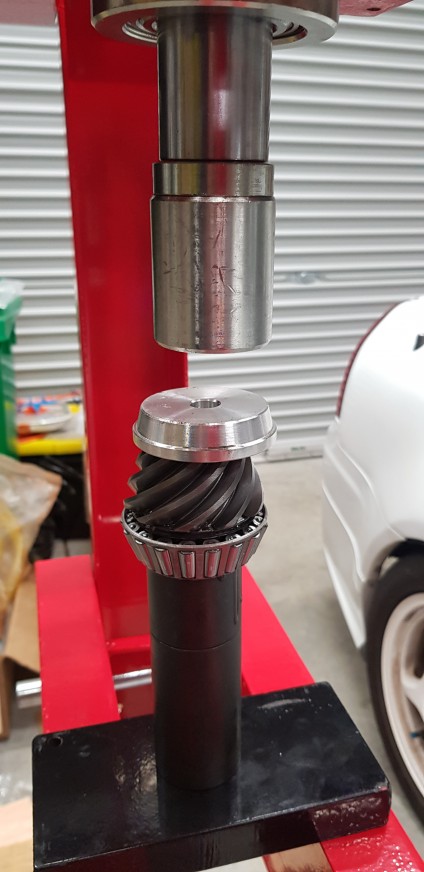
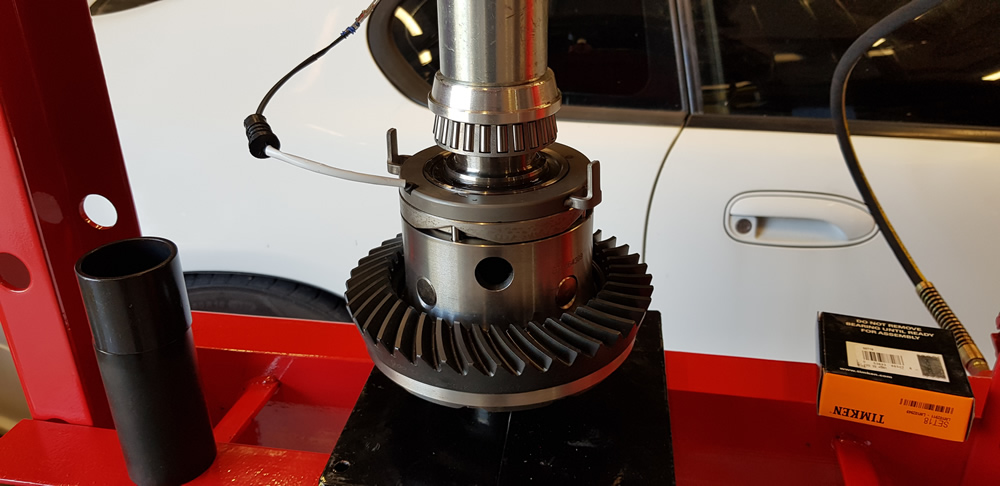
The crown wheel is a press fit item onto the diff locker. The first step is to align the holes as best you can and if possible partially thread on a couple of bolts. Once the holes are aligned a shop press is used to install the crown gear onto the diff locker carrier housing. The crown gear bolts are now installed and torqued to spec. For additional support, clamp the diff locker into a bench vise.
Next, new bearings need to be pressed onto the diff locker housing. This is done with a shop press and the correct diameter pipe or some bearing press dies. I achieved this using a combination of some dies that came with my ball joint remover/press. Make sure you do not apply pressure to the bearing cage when pressing, otherwise you will damage the bearing and you'll need to purchase a new one.
Before your new diff locker carrier and crown wheel can be installed into the housing, you must setup your shims. The best way to start is to use the original shims that came in your diff housing. This gives a good baseline to install the locker carrier. A good tip is to use a small amount of grease to stick the shims to the inside of the housing.
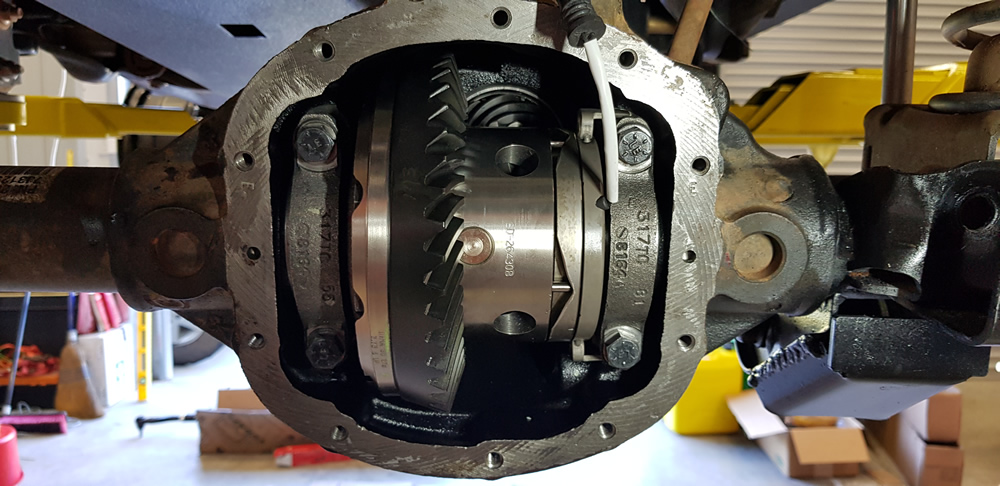
Insert the carrier carefully back into the housing making sure not to displace or damage the shims on either side of the housing. Once it is pushed in by hand as far as it will go, tap the carrier fully into place with a rubber mallet. Reinstall the diff bearing caps and do not attempt to "pull" the diff carrier into place by the caps. Torque the bolts to spec and you will be ready to test the diff pattern.
Diff Gear Setup Patterns
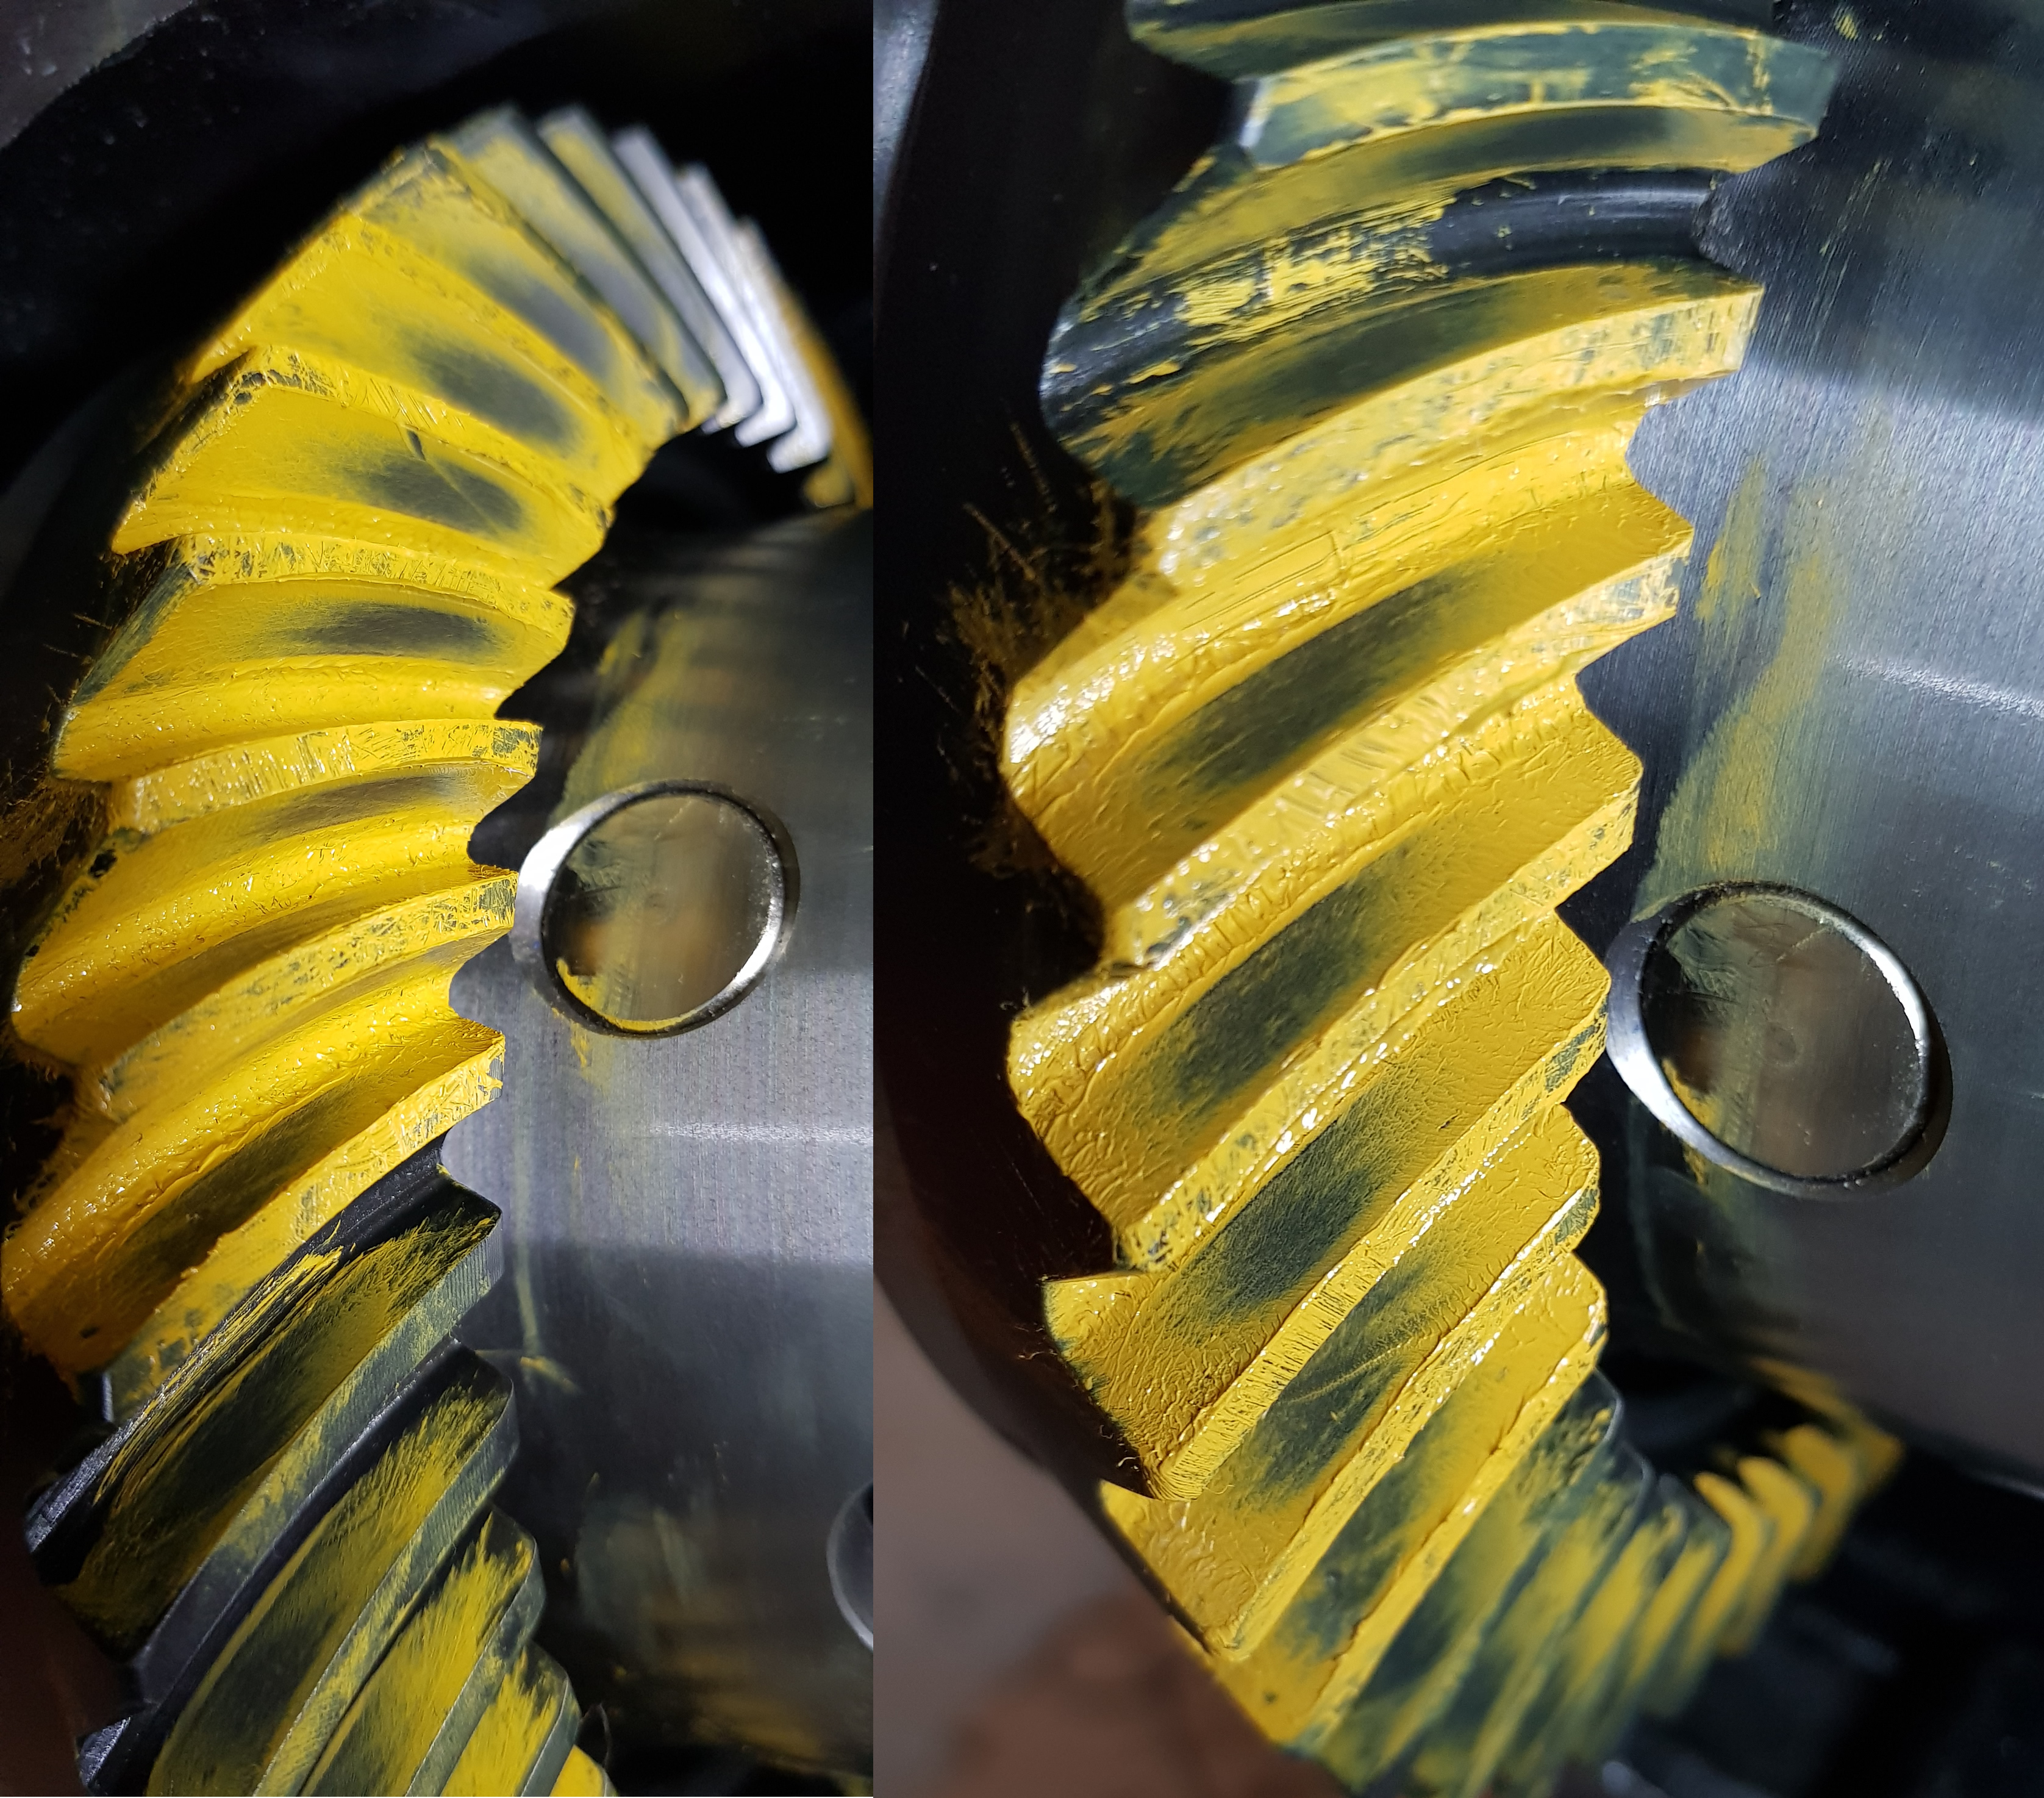
This is the most important part of diff gear setup. Supplied with your install kit is a small sachet of gear marking compound and a brush. The compound is brushed onto 3-4 teeth of the crown gear and then the crown gear is rotated against the pinion gear to mark a pattern into the compound. It is important to "load up" the diff while marking a pattern. A trick I used was to wrap a shop rag around the pinion yoke and hold tightly. Turn the crown gear using a spanner to force load against the pinion.
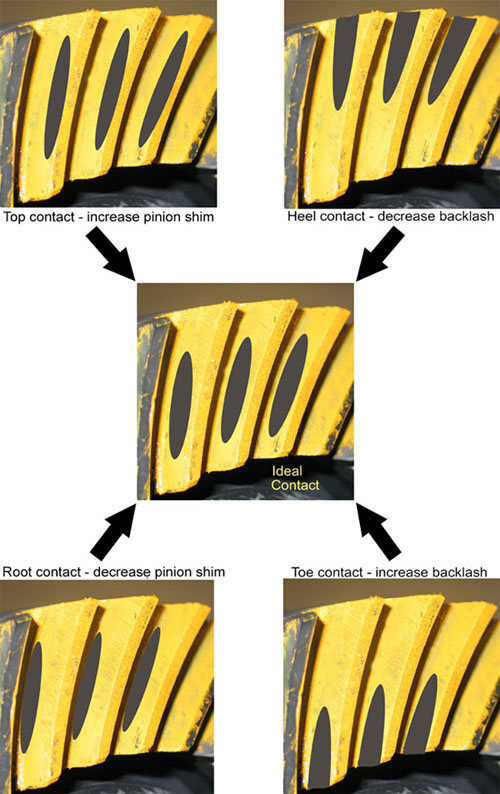
Once you have marked your first pattern, rotate the crown gear to a position where you can see the pattern clearly and inspect. You'll notice areas on the grown gear where the marking compound has been displaced by the pinion gear. This is the contact point.
Should the contact pattern be incorrect, you will then need to remove the diff locker carrier housing and the pinion and adjust the shim heights in order to achieve a better pattern. This is done in increments of 3 thou of an inch each time.
The following picture shows the desirable pattern and how to achieve it.
Final Installation
Once you have an ideal contact pattern showing on your diff gears, it's time to do a final installation. For the last time, remove the carrier and pinion from the housing. Install your brand new bearings (if you were using dummy bearings to do set-up), then re-install the pinion. Make sure you include all components such as the oil slinger and crush sleeve. Before installing your pinion yoke, be sure to install the new pinion oil seal.
Now that the pinion components are all installed, it's time to tighten the new pinion nut. This operation will crush the crush sleeve to create the proper preload on the pinion. It is very important to go slowly in this step and tighten only a 1/4 turn at a time, each time checking the pinion preload with your inch pound dial torque wrench.
If you over-tighten the crush sleeve and create too much pinion preload, it is unable to be reused and you must replace it before continuing.
Now the pinion has been installed, re-install the carrier with new bearings and correct shims. Make sure to use the carrier bearing caps in the correct locations and torque to spec.
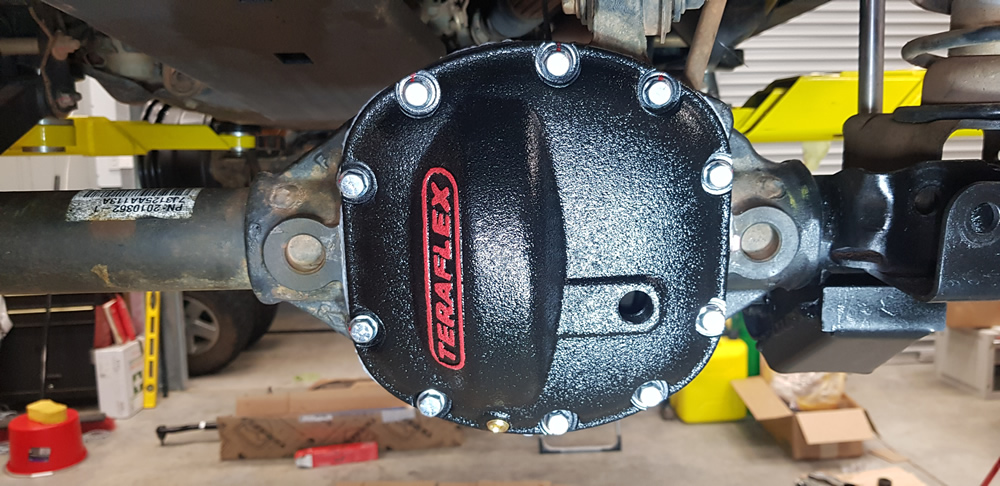
After we verified the pattern once more it was time to install the diff cover. We replaced the diff cover with an aftermarket one that is thicker and stronger than the original. Carefully run a bead of sealant around the diff cover and install the bolts in a star pattern making sure to alternate tightening. Our diff cover came with torque specs, make sure to follow the instructions with yours and don't overtighten.
We then left the diff overnight to set off the gasket sealant before filling with oil.
Your new diff gears and locker are now ready to use. Take note of the run-in procedure with your new gears. Ours mentioned
driving carefully with minimal load on the diff for the first 500km. An early oil change is recommended to clear the diff housing of
any minor metal shavings or debris.
Torque Specifications Reference
|
||||||||||||||||||||||||||||||||
|
Where to buy Diff Lockers
Tough Toys offers a range of diff lockers from their website here: https://www.toughtoys.com.au/products/categories/engine-and-drivetrain/diff-lockers/
If you have any questions about the install or your new lockers please contact us.